So you’ve gone and bought yourself high-quality software for managing reservations. Properly setting up this restaurant booking system is crucial in making it your ally in smooth operations.
This is where we come in, as this article serves as a step-by-step guide to configuring your booking system the right way.
We will go through all the essentials, from getting your settings sorted out to enabling your customers to make efficient table reservations, and more!
The first step concerns nailing down your restaurant’s profile. Let’s get started.
Fill Out Your Restaurant Profile
Often overlooked or carelessly filled out, your restaurant profile is essential to get the most out of your booking system.
Your reservation software will need some basic information about your restaurant to get you started.
So, before doing anything else, like configuring and customizing different settings, make sure to accurately create your restaurant profile and fill it in with the basic information shown in the next graphic.
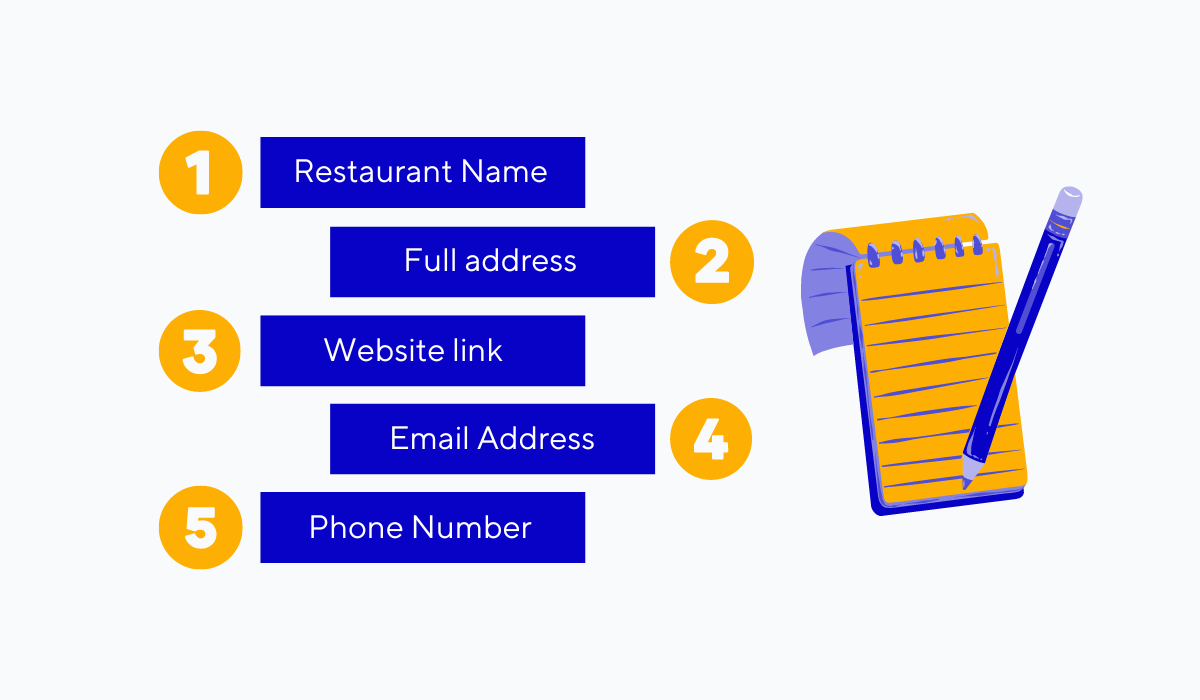
Source: Tablein
Having these details entered into your booking software makes sure that customers will have all the information they need right at their fingertips when they try and make a reservation.
They won’t have to go searching elsewhere for the information they need because your reservation system will serve it up to them on a platter.
The booking system will use this information in all widgets, notifications, and more. For example, look at how these details are incorporated in a reservation confirmation email.
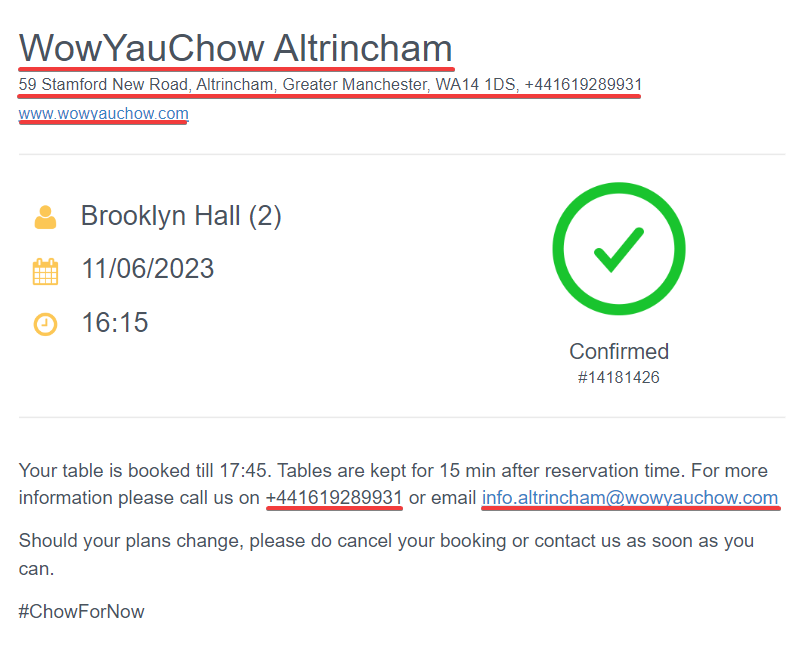
Source: Private email / WowYauChow
As shown in the screenshot above, this email includes everything we mentioned earlier, from the restaurant’s name to its phone number.
All of that is made possible by simply filling out the restaurant profile from the very beginning.
You should be especially careful when entering your contact details, such as your restaurant’s email and phone number, as they will appear at key moments in the booking process.
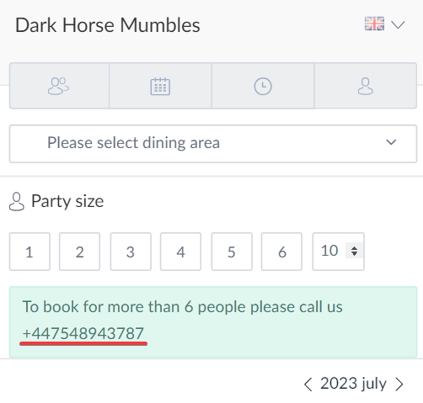
Source: Tablein
As you can see, if a customer tries to book a table for a large group, for more than six people in this case, the booking system cleverly displays the restaurant’s phone number so they can call to discuss the details.
But if you forgot to enter your restaurant’s phone number or entered it inaccurately, they won’t have a way to reach you, which could potentially mean a lost reservation.
To summarize, filling out your restaurant profile sets the foundation for your reservation system by feeding it with basic yet vital information about your restaurant.
Set Up Your Floor Plan
Setting up your digital floor plan is the next step in setting up your booking system.
Note that not all booking systems will allow you to set up your floor plan. Some will simply give you a list of your tables, as shown below.
Source: TableAgent
However, this way of doing things could hardly be called intuitive.
However, if you have a feature-rich restaurant booking system like our very own Tablein, you will have an easy-to-use floor plan creation feature at your command.
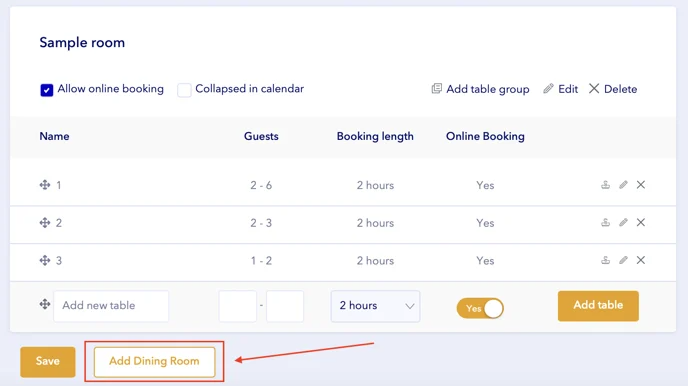
First off, you would go into Tablein’s table management settings.
Then, you would create separate dining areas and tables, with details like the number of guests that can be seated and the booking length, and select whether the table is available for online booking or left open for walk-ins.
Source: Tablein
After you do that, setting up the floor plan is as easy as dragging and arranging them on the screen, as shown in the next screenshot.

Source: Tablein
After a short while, you will have a copy of the real-life table arrangement you have at your establishment right in front of you.
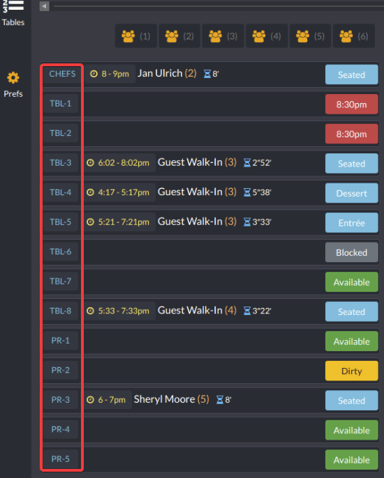
And this digital floor plan will come with a range of features, like color-coded tables to keep everything organized.
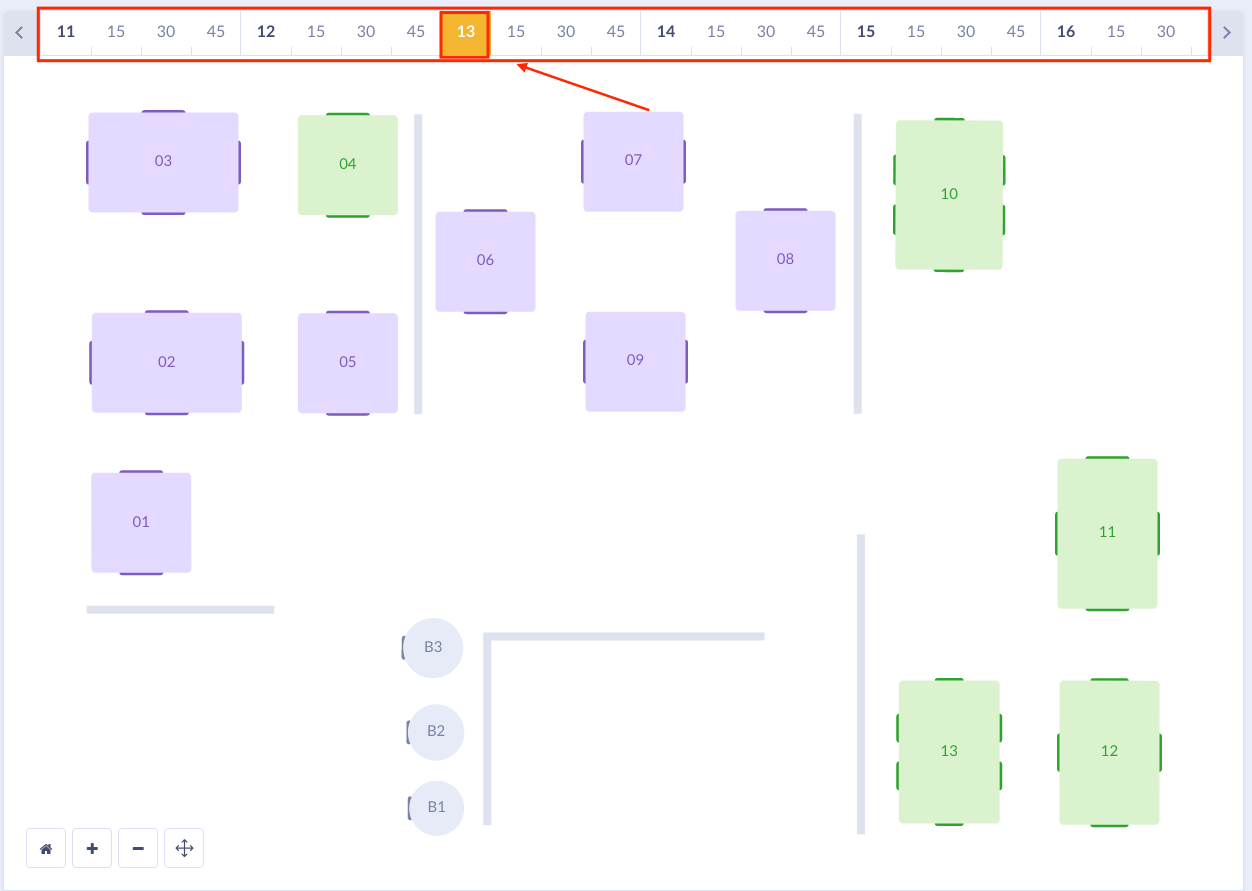
Source: Tablein
With a layout that mimics your restaurant’s and colors showing whether a table is available, reserved, occupied, or blocked, your staff will just have to glance at Tablein’s screen to see what the current situation is.
Voila! Your restaurant now has a digital twin, complete with a table layout that’s equipped with features to support your staff.
Define Your Opening Hours
Now, let’s not forget a basic but critical step in your software setup—defining your opening hours.
Basically, you want to ensure that your customers can make reservations only when you are open, so configuring your opening hours within the software is what you should do next.
Source: Tablein
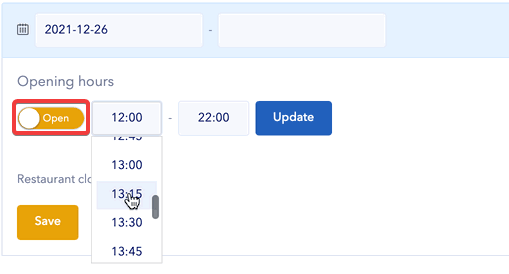
Typically, setting your opening hours simply involves entering your opening and closing times into the software.
It's pretty much like telling your reservation system not to let customers book outside these hours.
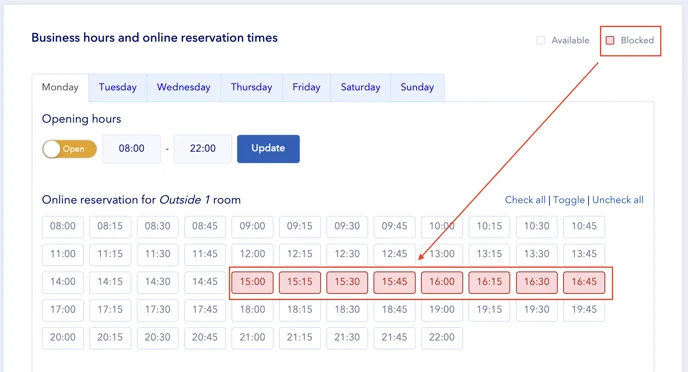
And blocking online bookings on certain periods should be just as simple. Maybe you have a break between lunch and dinner service, so your chefs can prepare for the dinner rush.
To avoid confusion, it’s crucial to block those hours so customers can’t make reservations, as seen in the image above.
Now, with less customizable booking systems, this step might end here. However, with Tablein, you have some other possibilities as well.
Source: Tablein
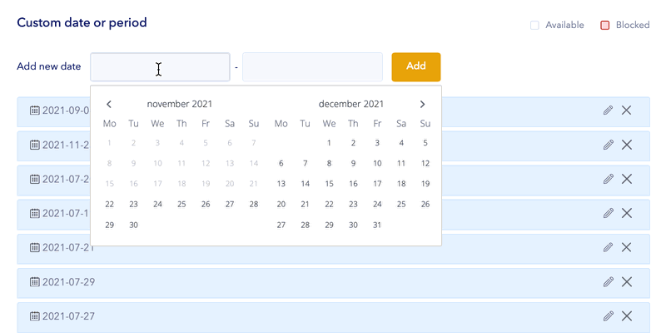
For example, say there's a local event, and you want to have special opening hours for just that day. Tablein lets you set a custom date or period for such an occasion.
Source: Tablein
Marking your restaurant as open on a date when it’s usually closed is as simple as picking the specific date, clicking on a toggle button, and switching it from “Closed” to “Open.”
Just as easily, you can block all reservations for a specific date when you usually accept reservations, as shown below.
Source: Tablein
By defining your opening hours accurately and using customization options when needed, you ensure your reservation system reflects the actual availability of your restaurant, preventing any confusion and maximizing revenue opportunities.
Configure the Booking Widget
Maybe the most important step on our list, and your fourth task, is to configure your booking widget in a way that ensures your guests get a seamless online booking experience.
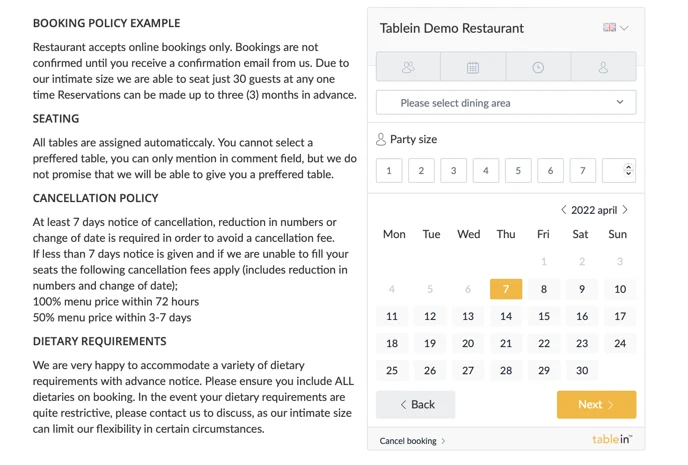
First things first, inside the widget settings, you would want to set the language options, describe your booking policy, and outline your terms and conditions.
Source: Tablein
Imagine what happens if a customer doesn’t understand what’s written in your widget because it’s in a language they don’t understand.
They won’t know how to book a table! So, setting the correct language is essential.
The booking policy is just as necessary to get right since it's displayed directly in the booking widget, as seen above, and informs your customers about what is expected of them when booking a table at your restaurant and how to do so.
After the essentials, configure the settings to tailor the booking process according to your requirements.
This process includes defining the minimum and maximum number of customers that can make a reservation and whether you will allow them to select their preferred dining area.
It’s also important to set how far in advance customers can book tables.
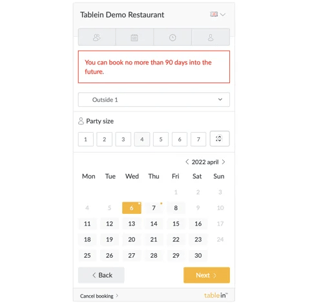
Source: Tablein
In the example above, it’s set to 90 days, but whatever number you set will be clearly displayed to customers within the widget.
As a cherry on top, you can set up a thank you page that customers will be redirected to after they successfully make a reservation. Something simple, perhaps, like the example page shown below.
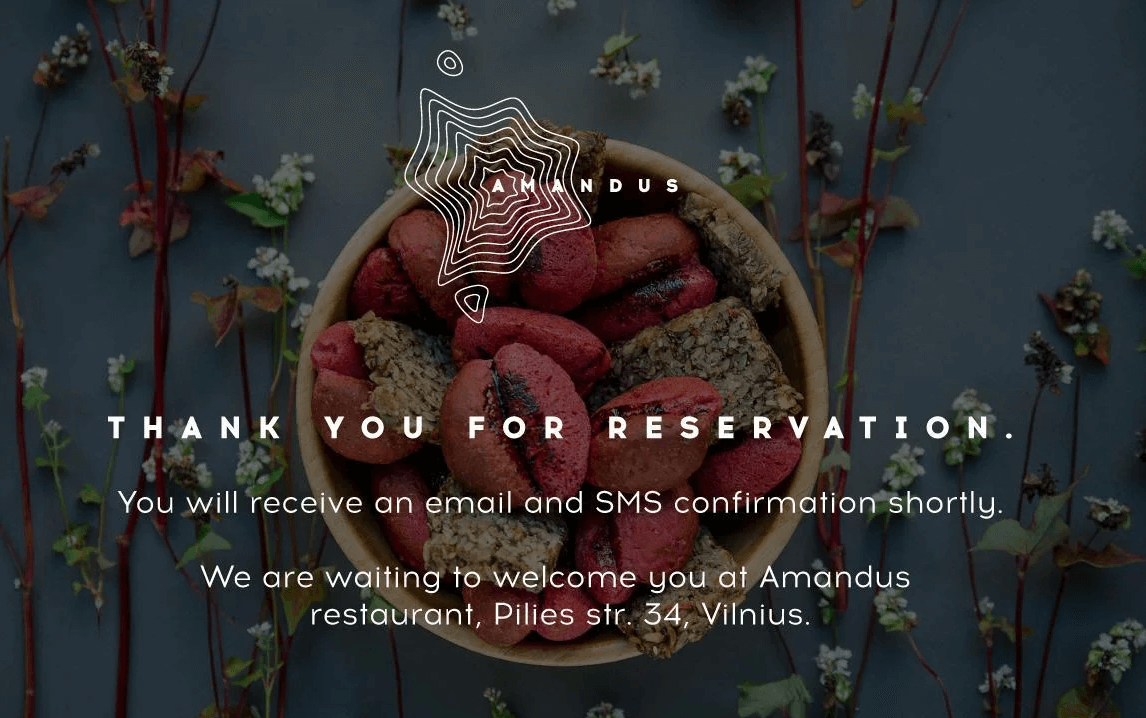
Source: Tablein
All in all, the booking widget is like the face of your reservation system. Setting it up well ensures it will be informative, user-friendly, and provide a pleasant booking experience for customers.
Integrate the Booking Widget
Once your booking widget is properly set up, it’s time to use your booking system’s widget integration options to enable customers to reserve a table from various online platforms.
The first thing you want to do is integrate the widget into your restaurant’s website.
This integration is essential because your website acts as the digital face of your restaurant, and it's often the first place potential customers will look for to make a reservation.
You can follow the example of Symondsbury Kitchen, shown below.

Source: Symondsbury Estate
As you can see, integrating the widget into your website usually involves embedding a “Book Now” button into the site.
When customers click this button, they’ll be taken straight to your booking widget where they can make a reservation.
But why stop at your website? You can also integrate your booking widget with Google.
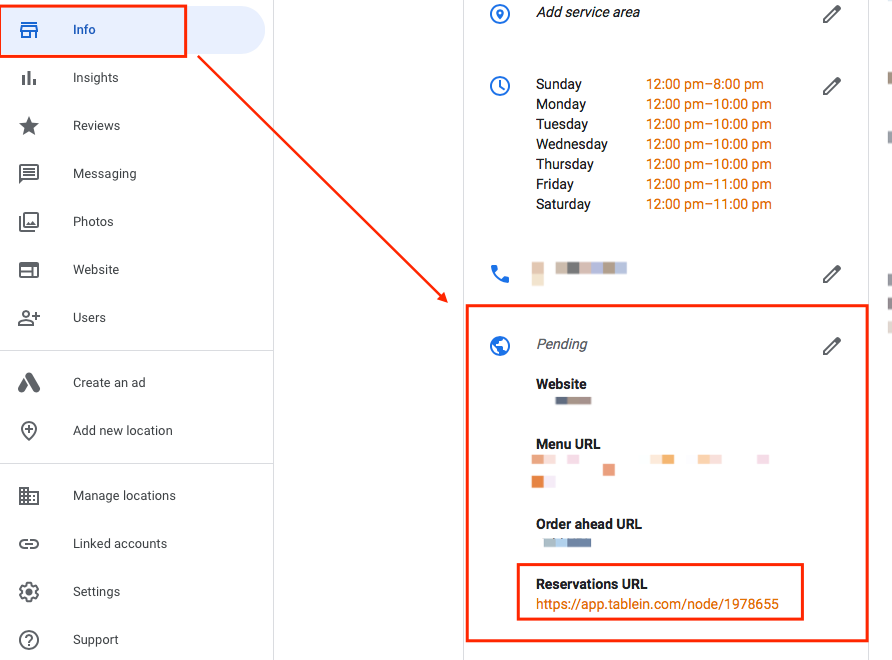
Source: Tablein
Doing this is as simple as adding your widget link to the Info section of your Google Business Profile.
This way, whenever customers find your restaurant through one of Google’s services, your booking link will be readily available for them to click on.
It’s more convenient for potential customers because they won’t have to look up your website themselves.
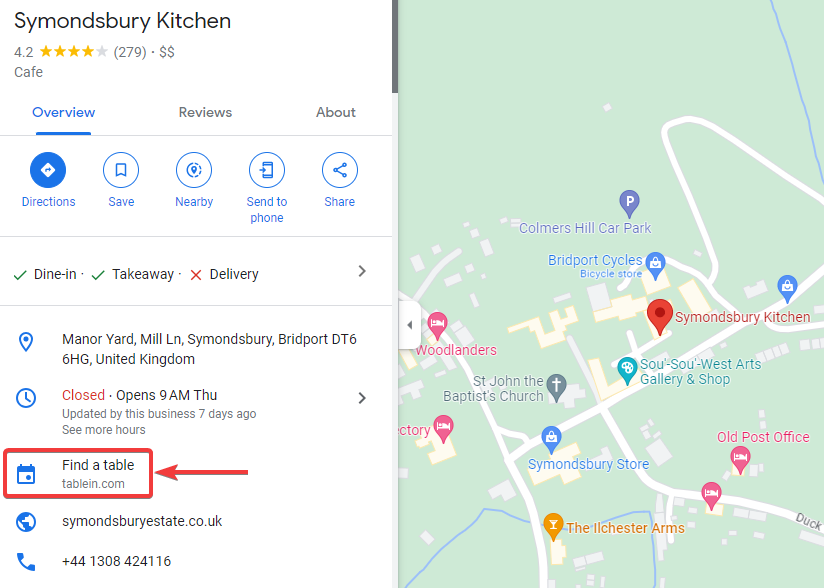
Source: Symondsbury Kitchen on Google Maps
This is particularly useful for customers who find your restaurant through Google Maps, as shown above.
With a single click on the “Find a Table” link, they’ll be redirected to the booking widget screen where they can make a reservation.
As a final note, don’t forget to take advantage of your software’s social media widget integration options.
Tablein, for example, can integrate with both Facebook and Instagram, providing yet another avenue for potential customers to book a table.
In conclusion, by casting a wide net and integrating your booking widget across multiple platforms, you are essentially increasing the discoverability, visibility, and accessibility of your restaurant.
Enable Automatic Notifications
Last but not least, let's focus on the importance of establishing effective lines of communication within your booking software.
By doing so, customers will be informed about the status of their booking, and staff will be kept in the loop.
Enabling and configuring automatic email and SMS notification options will allow you to do just that.
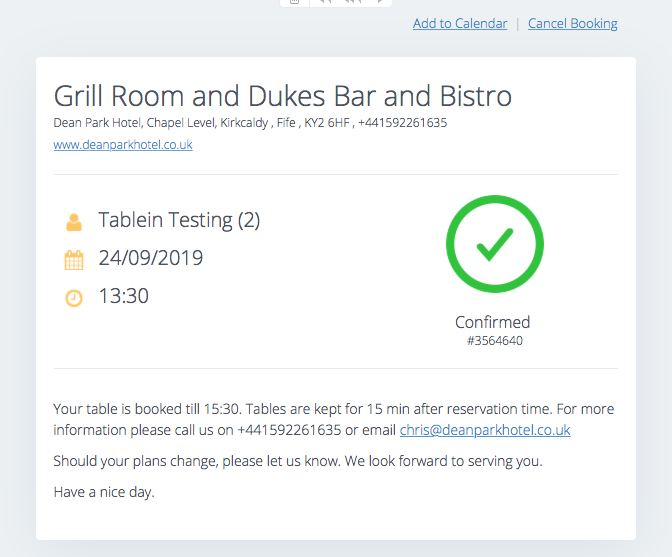
For example, by enabling automatic reservation confirmations, every time a guest successfully makes a reservation, they will receive an email confirming the details of their booking.
This serves as a reminder to customers and also reduces the chances of no-shows.
Source: Tablein
But that’s not all when it comes to automated communication with customers. Several types of messages should be automated as well, if your software allows it.
In Tablein, for both email and SMS communication, you have the following automation options to choose from:
- Reminders
- Feedback requests
- No-show messages
- Table’s ready messages
Each type of communication is important for keeping customers adequately informed about their reservation status.
In addition, it’s advisable to set up custom notifications for your staff, as they should be kept in the loop regarding reservations as well.
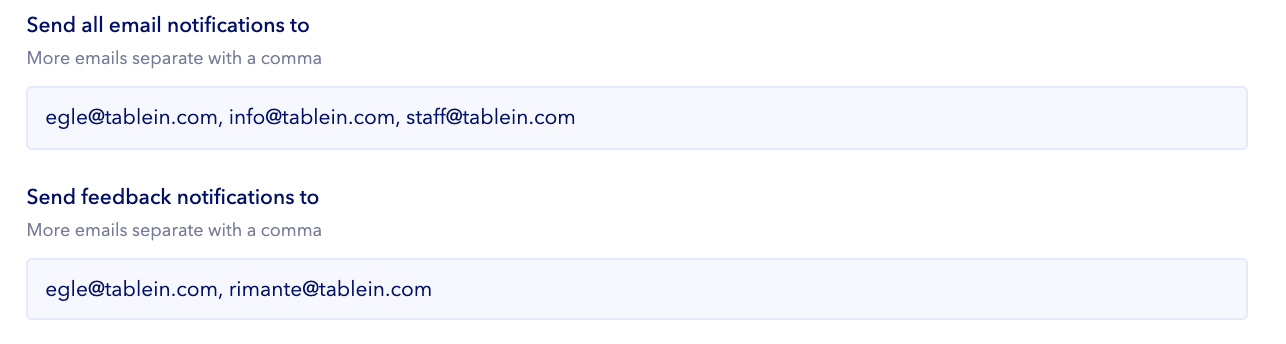
Source: Tablein
Custom automated emails can be configured to ensure that the relevant staff members are notified of new reservations, cancellations, and customer feedback.
These messages are very useful as they ensure your staff is well-prepared to provide excellent service when the time comes.
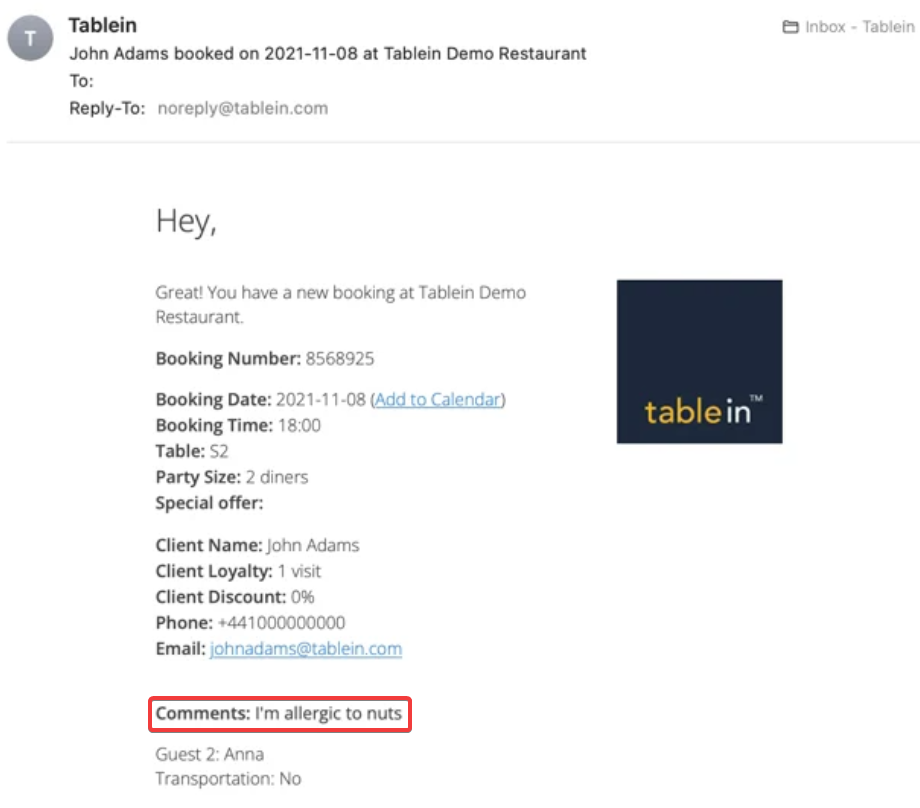
Source: Tablein
For instance, when a reservation email like the one shown above is forwarded to your staff, they will be quick to notice that the customer left a note that they are allergic to nuts.
This information will be of critical importance in creating a safe dining experience for the customer.
Setting up automatic notifications is like having a well-oiled communication machine.
It keeps everyone informed and ensures that both customers and staff have a clear understanding of what’s happening at all times.
All that, and without the need for manual intervention by you or your staff. After the initial setup, your booking system takes over and does the rest.
So, the takeaway here is clear: automate your communication by enabling automatic notifications.
Conclusion
As you can see, setting up a restaurant booking system shouldn’t be a difficult task, especially if you are using intuitive and easy-to-use software.
From setting up your reservation software to smoothing out the online reservation process, we’ve covered it all in this handy guide to create a seamless booking process for you and your customers.
Hopefully, after reading this article, you now have the confidence to tackle the booking system setup process.
So, go ahead and get your restaurant booking system set up and in tip-top shape.
Share this
8 Tips to Help You Make the Most of Your Restaurant Capacity

How to Choose the Best Restaurant Booking System